QA Automation Checklist: 12 Steps to Get Started
12-step QA automation checklist to plan, build, and scale tests—set SMART goals, pick tools, integrate CI/CD, reduce flaky tests, and measure ROI.

QA Automation Checklist: 12 Steps to Get Started
Manual testing slowing you down? Automation can speed up testing, cut costs, and improve consistency. With software releases happening faster than ever, QA teams need efficient solutions to keep up. This 12-step guide outlines how to set objectives, evaluate processes, choose tools, and build a scalable test framework. Key takeaways include:
- Set Clear Goals: Define measurable objectives like 95% test coverage or reducing defects by 20%.
- Prioritize Automation: Focus on repetitive, high-impact tests (e.g., regression, smoke tests) while leaving subjective tasks for manual testing.
- Choose the Right Tools: Use AI-driven platforms with features like self-healing scripts and plain-language test creation.
- Integrate with CI/CD: Automate tests to run with every code commit, ensuring faster feedback loops.
- Maintain and Scale: Regularly review results, fix flaky tests, and plan for growth with flexible tools.
Fact: Companies report saving up to 93% on testing costs by automating processes. Following this roadmap ensures efficient, reliable QA workflows that align with business goals.
12-Step QA Automation Implementation Checklist
Intro to QA Automation (With Real Examples + AI in Testing Explained)
sbb-itb-eb865bc
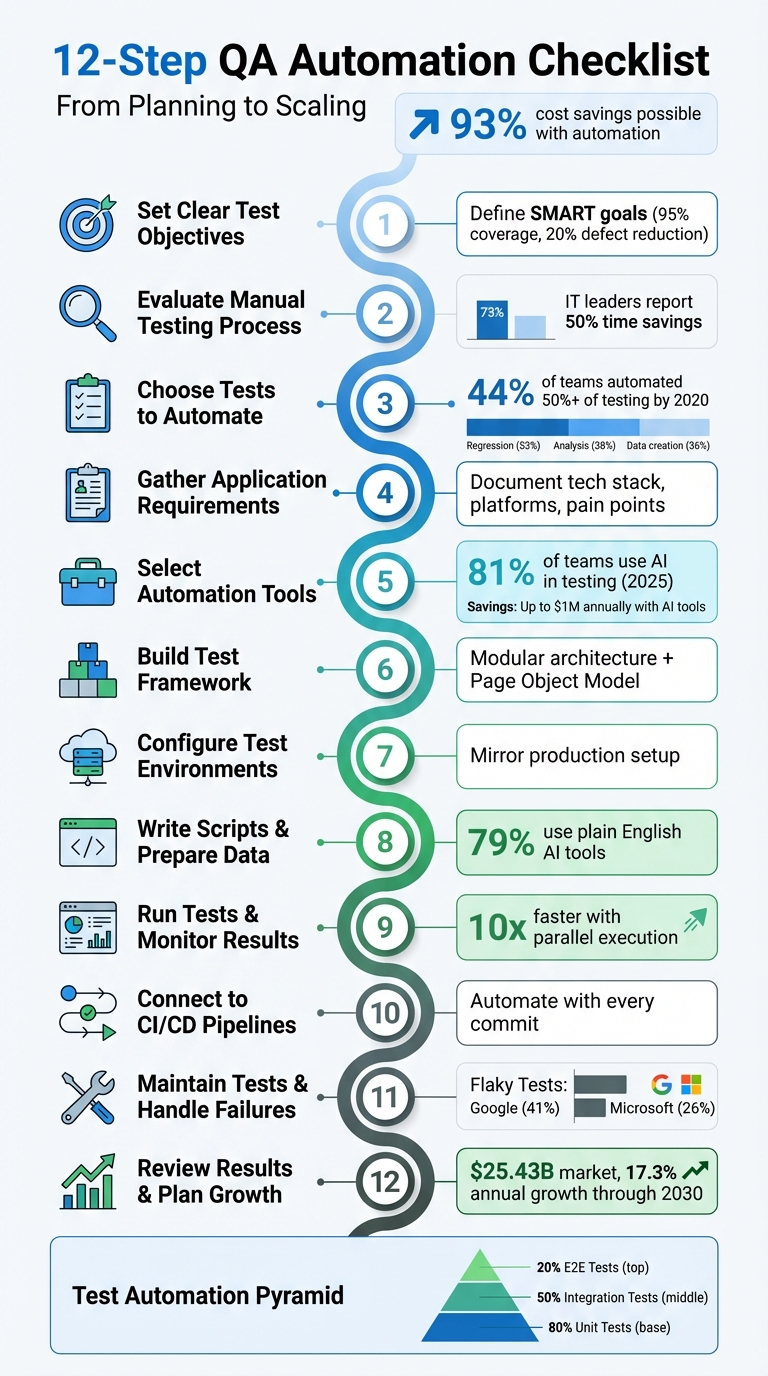
Step 1: Set Clear Test Objectives
Before diving into coding, it’s critical to pinpoint exactly what you want to achieve. Without well-defined, measurable goals, automation projects can lose direction and waste time and resources. Clear objectives ensure that your tests and scripts are purposeful, avoiding redundancy and inefficiency. This step sets the stage for a smooth and effective automation process.
To achieve this, adopt SMART goals - Specific, Measurable, Achievable, Relevant, and Time-bound. For example, aim for 95% test coverage or a 20% reduction in critical defects. Instead of vague aspirations, focus on precise targets tied to your application's core functions, like checkout workflows or user sign-up processes.
"Setting SMART goals for your QA team is essential as they provide clear direction, measurable milestones, and achievable targets." - Martina Stojmanovska, Technical Copywriter | Editor, TestDevLab
Once you’ve outlined your objectives, prioritize them by assessing their business impact and risk. Pinpoint high-risk areas where failures would result in significant costs to your organization. For instance, prioritize workflows directly tied to revenue, such as payment processing or account creation, to safeguard business continuity. Additionally, identify repetitive tests that consume a lot of manual effort - automating these can deliver immediate value by saving time and reducing workload.
To demonstrate the return on investment (ROI), quantify the benefits of your automation efforts. For example, you could reduce testing time from an entire day to just one hour or lower bug reopen rates by 15%. Collaborate with key stakeholders early on to align on objectives and expected ROI. With clear goals in place, you’ll be ready to assess your current manual testing process and move forward.
Step 2: Evaluate Your Manual Testing Process
With your objectives in place, it’s time to take a close look at your manual testing workflows. This step is all about identifying tasks that eat up time, are prone to errors, or could deliver the most value if automated. While 73% of IT leaders report that automation can save around 50% of testing time, the key is knowing where automation will make the biggest difference.
Start by focusing on repetitive tests highlighted during your objectives review. Smoke tests and regression suites are excellent candidates - they require consistent execution but often demand significant manual effort. Similarly, data-driven scenarios that involve repetitive inputs or complex rule validations are both time-intensive and prone to human error. Manual cross-browser testing across different browsers and operating systems is another major time sink that automation can handle efficiently in parallel.
"Manual testing can feel like navigating a maze – time-consuming, repetitive, and prone to human error." - Valeriia Kuchuhurna, Business Development Manager, QATestLab
Beyond specific test types, think about your team’s capacity and the technical challenges of your application. For instance, if your QA team is small and struggling to keep up with the pace of new features, manual testing can become a bottleneck, limiting test coverage. Applications with complex architectures, APIs, or microservices especially benefit from the consistency that automation offers. However, not all manual tests should be automated - tests involving subjective elements, like UI design or exploratory testing, still require human judgment. Instead, focus automation on stable, high-priority workflows tied directly to critical business functions, such as checkout processes or account creation.
Another important metric to track is your "escape rate" - the number of bugs that make it to production versus those caught during testing. This can help you identify weak spots in your current workflows. To take it a step further, use a risk assessment matrix to rank manual test cases based on their business impact and technical complexity. This will help you target the areas where failures could have the highest cost to your organization. By the end of this evaluation, you’ll have a clear roadmap for which tests to prioritize for automation in the next phases.
Step 3: Choose Which Tests to Automate
Now it's time to decide which tests are worth automating. Focus on tests that deliver the most value with the least upkeep. This step builds on the insights from your manual testing evaluation. By 2020, 44% of IT teams had automated more than half of their testing processes. Additionally, automated tests have replaced about 46% of tasks that were previously done manually. Key areas for automation include regression testing (53%), results analysis (38%), test data creation (36%), and performance testing (34%).
A helpful tool here is a decision matrix, which lets you rank test cases based on factors like frequency, impact, stability, and complexity. Start with high-frequency tests such as regression suites and smoke tests. Pay special attention to workflows directly tied to revenue, like login processes, checkout systems, or payment gateways. High-impact failures in these areas highlight the need for robust automated regression testing. Focus on stable features to minimize maintenance, and consider automating repetitive, data-heavy scenarios or tasks involving complex calculations - areas where human error is more likely.
"It is impractical to automate all testing, so it is vital to determine what test cases should be automated first." - Mohammad Hassaan Momin, MobileLive
To organize your efforts, use the test automation pyramid framework. This framework helps distribute automation across three levels of testing. At the base are unit tests, which should make up the bulk of your suite. They’re fast, give developers quick feedback, and catch issues early when fixes are least expensive. Addressing bugs at this stage can save up to 10 times the cost compared to fixing them later in the cycle. The middle layer focuses on integration tests, which check how modules, databases, and APIs interact, catching issues that unit tests might miss. At the top are end-to-end (E2E) tests, which simulate real user actions. However, these should be limited to critical "happy path" scenarios because they’re slower, resource-heavy, and more prone to errors. A balanced approach might aim for 80% unit tests, 50% integration tests, and 20% UI/E2E tests to keep things efficient.
Avoid automating tests that rely on subjective human judgment, like exploratory testing, usability reviews, or features still under active development. Automation must justify its maintenance costs. Focus on immediate priorities instead of overengineering for potential future needs. Many organizations follow the 80/20 rule, automating 80% of test cases and leaving 20% for manual exploratory testing. Use the risk assessment matrix from Step 2 to identify high-risk areas where failures would be especially costly, ensuring those paths are automated first. This approach maximizes ROI while keeping maintenance manageable.
Step 4: Gather Application Requirements
After setting clear objectives and carefully choosing your tests, the next step is to gather detailed application requirements. This step is all about creating a comprehensive blueprint that guides your automation strategy. You'll need to collect technical details such as the technology stack, architecture, integrations, and any pain points. This blueprint is essential for selecting the right tools and designing effective test automation.
Start by documenting your development technology. List the programming languages, frameworks, and back-end connections like APIs, web services, or database hooks. Aligning your automation tools with your team's technical skills ensures smoother implementation and supports efficient headless testing. As noted by Selenium.dev:
"Calling an API and talking to a database are quick, 'headless' operations that don't require the expensive process of opening a browser, navigating to the right pages, clicking and waiting for the forms to be submitted".
This approach not only speeds up testing but also avoids the instability often linked to browser-based automation.
Next, define your platform and environment. Identify the browsers, operating systems, mobile devices, and network conditions your application targets. Evaluate whether your infrastructure supports parallel execution, or consider using cloud-based grids if needed. Also, document requirements for data management and any authentication complexities, such as SAML, SSO, or MFA.
Finally, take a close look at past automation challenges. Issues like dynamic IDs, Shadow DOM complexities, or frequent UI changes can derail testing if not addressed. Categorize application modules based on their business impact and complexity to focus on critical workflows like payments or logins. Notably, QA frameworks that incorporate AI have been shown to reduce costs by up to 40%.
Step 5: Select Your Automation Tools
Choosing the right automation tools means balancing technical needs with practical application. By late 2025, 81% of development teams had integrated AI into their testing workflows. This shift highlights a growing preference for intelligent automation over traditional scripting methods.
When evaluating tools, focus on AI-driven features that simplify maintenance. For example, self-healing capabilities can automatically adapt to changes in UI elements, reducing the need for constant updates to brittle selectors. Additionally, natural language processing allows non-technical team members to write tests in plain English, making automation more accessible.
"The best testers often struggle with scripting... Wouldn't it be amazing if I could have my best testers be able to do automation?" - Don Jackson, Perfecto
Platforms like Rock Smith leverage AI to provide advanced features such as semantic targeting and autonomous edge case generation. Semantic targeting identifies elements based on your application's context rather than relying on fragile selectors. Meanwhile, the edge case generation feature analyzes your application to create tests that cover everything from common user paths to invalid inputs and potential bugs that manual testing might overlook.
The financial impact of adopting AI-driven tools can be significant. One organization reported saving $1 million annually by replacing thousands of manual assertion lines with AI-based visual checkpoints. Another projected savings of $240,000 over two years by switching from traditional tools to AI-powered automation.
When considering pricing, look for models that fit your testing needs. For instance, Rock Smith offers a Pay-As-You-Go model at $0.10 per credit, providing flexibility for teams with fluctuating workloads. For teams requiring consistent high-volume execution, Professional plans offer predictable costs. Remember to evaluate the total cost of ownership, factoring in not just licensing fees but also training, maintenance, and infrastructure expenses. Tools that demand extensive training may lead to hidden costs.
Before committing, download trial versions to ensure compatibility with your tech stack. Prioritize tools that support modular and reusable tests to reduce code bloat and long-term maintenance challenges. The right tool should significantly boost efficiency - delivering up to a 10x improvement in test creation speed. Additionally, ensure the tool integrates seamlessly with your CI/CD pipeline to streamline your testing framework.
Step 6: Build Your Test Framework
Once you've chosen your automation tools, the next critical step is building a test framework that serves as the backbone of your test suite. A well-structured framework is essential for managing and scaling your tests efficiently.
Start with a modular architecture that divides your application into small, independent components. This design ensures that when one module changes, it doesn't disrupt the entire test suite. A popular approach for UI testing is the Page Object Model (POM). POM separates page-specific locators and behaviors from the test logic itself. For instance, if your development team updates a button's ID or moves a form field, you only need to make changes in one place instead of scouring through multiple test scripts. This structure simplifies maintenance and keeps your codebase organized.
Stick to the DRY (Don't Repeat Yourself) principle by consolidating repetitive actions into reusable methods. For example, common sequences like logging in can be encapsulated in a single method. Also, ensure functions remain focused - each should handle one specific task. If a function grows beyond 200 lines or a class exceeds 20 methods, break them into smaller, more manageable pieces for clarity and ease of use.
From the outset, establish clear coding standards. Consistent naming conventions, centralized error handling, and configuration management promote collaboration and reduce confusion. Store environment-specific details, such as URLs and credentials, in configuration files rather than hardcoding them into scripts. Use version control systems like GitHub to track changes, collaborate with team members, and easily roll back to previous versions if needed.
Avoid overengineering your framework by focusing only on current requirements. For example, defining locators for every page element before they're needed can lead to unnecessary complexity and bloated code. Finally, document your framework's design thoroughly. This documentation will make onboarding new team members smoother and ensure future updates can be implemented without hassle. By building a strong foundation, you'll set the stage for reliable and efficient test automation that aligns with your QA goals.
Step 7: Configure Test Environments
To ensure accurate testing, your environments should mirror your production setup as closely as possible. This means aligning hardware, software, browsers, operating systems, and network conditions with those of your production environment. When there are differences, bugs can go unnoticed during testing and only appear when real users interact with your application - something you definitely want to avoid.
Start by leveraging Infrastructure-as-Code (IaC) tools to automate the provisioning of your test environments. Automating this process ensures consistency across all stages of testing and eliminates the risk of errors caused by manual setup. For browser and operating system testing, consider using a cloud-based testing platform that gives you access to real devices and browsers.
Don’t overlook security and accessibility. If you’re testing internal or staging applications behind a firewall, secure tunneling technology can create safe connections between your private servers and a cloud-based testing platform. Sensitive credentials, such as API keys, should always be stored as environment variables within your CI/CD platform instead of being hardcoded into scripts. To maintain compliance with regulations like GDPR and PCI DSS while using realistic test data, implement data masking or anonymization techniques.
For dependencies like third-party APIs, microservices, or unstable systems, service virtualization can be a game-changer. This approach allows you to simulate these systems, replicate performance variations, and even introduce controlled faults to test how resilient your application is under real-world conditions. Additionally, managing test data effectively is crucial. Keep your test data under version control so you can easily reset it when needed - poor data management often leads to unreliable tests.
Step 8: Write Test Scripts and Prepare Data
Once your test environments are set up, the next step is crafting effective test scripts and organizing your test data. Start by writing test scripts in plain English, leveraging AI-driven tools like Rock Smith - an approach already adopted by 79% of companies.
Clearly outline the purpose and functionality of your application. Break down prompts into simple, step-by-step instructions, as AI tools perform better with concise and focused guidance. Stick to standardized industry terminology instead of using internal jargon or abbreviations to maintain clarity.
When preparing test data, don’t limit yourself to just the "happy path" (the ideal scenario where everything works as expected). Use diverse datasets to test a single script with multiple variations, covering different user roles, edge cases, boundary conditions, and invalid inputs. This approach allows you to explore numerous scenarios without the need to write separate scripts for each one. Design scripts to pull varied credentials from centralized data sets, ensuring flexibility. Keep sensitive data hidden to prevent exposure in logs or interfaces.
Adopt the Single Responsibility Principle, where each function focuses on a specific part of your application’s functionality. Store locators as variables in a centralized test-data module rather than embedding them directly in your scripts. This way, if a UI element changes, you only need to update one variable to reflect the change across all references. Additionally, create reusable rules for repetitive tasks like login or navigation to save time and effort.
Modern AI tools can automatically repair broken tests, significantly reducing the need for manual maintenance. Categorize your tests - such as Sanity, Regression, or Mobile - to make your testing process more organized and adaptable. By following these steps, you’ll be well-prepared to execute reliable and efficient tests in your automated workflow.
Step 9: Run Tests and Monitor Results
Once your test scripts are ready, it's time to execute them and keep a close eye on the results. Running tests in parallel can dramatically cut down execution times - sometimes by as much as 10x. For example, during parallel execution, some setups have seen impressive speed improvements.
Take Edureka's 2024 experience: they used a cloud-based Selenium Grid to run nearly 200 tests simultaneously. What used to take them an hour was completed in just five minutes. This not only sped up their release cycles but also ensured they achieved full browser coverage.
Cloud-based testing grids are game-changers. They give you scalable access to thousands of device and browser combinations without the hassle of managing on-premise hardware. A state government agency, for instance, adopted an online Selenium Grid and saw their total build execution time drop by 70%. Test execution time was also slashed by 66%, thanks to parallel testing and custom tagging integrated with JIRA. This scalability improves both test coverage and the overall efficiency of release processes.
To make sense of your test results, structured logging is key. Capture details like test steps, input values, timestamps, and error messages in formats like JSON. Include metadata such as environment IDs and specific API endpoints. Tools like Allure, TestRail, or ReportNG can then help you visualize trends, such as pass/fail rates and execution times. Additionally, real-time debugging tools with features like video recordings, automated screenshots, network logs, and console logs make it easier to identify and fix issues as they happen.
Keep track of quality metrics such as pass/fail rates, execution times, defect detection rates, test coverage, latency, throughput, error rates, and resource usage (like CPU, memory, and disk I/O). Aim for benchmarks like response times under 200ms. By 2020, 44% of IT teams had automated more than half of their testing, and 24% of organizations saw an immediate boost in ROI after adopting automated testing.
Address flaky tests by investigating timing issues or unstable environments. Integrate your tests into CI/CD pipelines so they run automatically with every code commit, giving developers instant feedback. Using containerization tools like Docker can also help maintain consistent testing environments, reducing the risk of environment-specific problems.
Step 10: Connect to CI/CD Pipelines
Once you've monitored your test results, the next step is to integrate those tests into your CI/CD pipeline. This integration ensures a smoother feedback loop and streamlined deployment process. Automated tests should run with every commit, helping catch defects as early as possible. To set this up, link your version control system - such as GitHub, GitLab, or Bitbucket - with a CI platform like Jenkins, GitHub Actions, or GitLab CI. It's also essential to define a branching strategy, like Trunk-based development or GitFlow, to determine how code changes trigger automation workflows.
When structuring your pipeline, divide it into three key stages: Build, Test, and Deploy. The Build stage compiles the code and resolves dependencies using tools like Maven, Gradle, or npm. The Test stage validates functionality through automated scripts. Finally, the Deploy stage pushes verified code to staging or production. Configure the pipeline to halt immediately if any test fails - this "fail fast" approach saves time and resources.
A practical example from October 2023 highlights this process. Ruslan Kazakov, a QA automation expert at Bear Plus, implemented an end-to-end testing pipeline using CodeceptJS and Playwright, integrated with GitHub Actions. His team utilized a Playwright Docker image (mcr.microsoft.com/playwright) to run tests across Chromium, Firefox, and WebKit. They set up separate GitHub Actions jobs for each browser and used parallel workers, which resulted in efficient test execution and detailed failure feedback. This example demonstrates how CI/CD integration can significantly speed up feedback loops.
To further optimize, run tests in parallel across multiple containers or runners. This reduces execution times and provides developers with quicker feedback. Tools like Docker are invaluable here, as they help create testing environments that mirror production, reducing the chances of inconsistencies.
Step 11: Maintain Tests and Handle Failures
Keeping your tests in good shape is a cornerstone of any effective automated QA strategy. One key takeaway? Address flaky tests as soon as they crop up. As Nebojša Stričević from Semaphore wisely notes:
"The first appearance of a flaky test is the best moment to fix it".
The data reinforces this urgency: about 41% of tests at Google and 26% at Microsoft have been identified as flaky. Additionally, a 2021 survey found that 47% of failed CI jobs succeeded after being manually restarted.
To manage flaky tests effectively, temporarily move them into a "flaky test bucket." However, this should only serve as a short-term solution. SmartBear offers this advice:
"The flaky test bucket should not be a final destination. It should be a transitionary point as you rework your tests to be even better".
Each flaky test should be documented with a clear resolution timeline in your ticketing system. Set a strict deadline for how long a test can remain in quarantine - either fix it or remove it altogether.
When tackling test failures, avoid relying on static sleep commands. Instead, use polling mechanisms or callbacks to handle asynchronous processes more effectively. Tools like Docker can help standardize dependencies across environments, eliminating the infamous "works on my machine" problem. Additionally, configure your test framework to automatically capture screenshots, HTML dumps, or even video recordings at the moment of failure. These artifacts can significantly speed up the debugging process.
Sometimes, automated logs won't give you the full picture, especially if a test fails unpredictably without code changes. In such cases, manual investigation becomes essential to identify issues like environmental drift, timing conflicts, or race conditions. For areas like user experience and accessibility, manual testing often proves more reliable than automation. When deeper investigation is needed, use SSH debugging to interact with running CI jobs and reproduce failures in real time.
To ensure long-term stability, dedicate time during each release to analyze and fix tests. Externalizing test data into formats like CSV, JSON, or databases allows you to update data without altering the test logic. For UI tests, adopting the Page Object Model (POM) helps keep your code modular - when a UI element changes, you’ll only need to update it in one place rather than across multiple scripts.
Step 12: Review Results and Plan for Growth
Once your test suite is up and running consistently, it's time to assess its performance and think about scaling. Start by analyzing key metrics like the defect detection rate (how many bugs your tests catch before reaching production), test coverage percentage (the portion of your application covered by tests), and test execution time compared to manual testing. Keeping an eye on pass/fail trends over time can also reveal whether your application quality is improving or if specific areas need more attention.
The numbers speak for themselves when it comes to automation's expansion. In 2022, the test automation market reached $25.43 billion and is expected to grow by 17.3% annually through 2030. Companies are increasingly automating tasks like regression testing (53%), analysis (38%), test data creation (36%), and performance testing (34%).
Document your findings - what worked, what didn’t, and why. This is crucial for improving your processes. Create feedback loops between your development and QA teams to identify gaps in test coverage and refine your strategy. Regular audits of your test scripts ensure they stay relevant as your application evolves. Treat this documentation as a living resource that helps avoid repeating mistakes and guides future improvements.
As your testing needs grow, your infrastructure must grow with it. Switching from local execution to cloud-based grids with parallel execution can eliminate bottlenecks and handle increased test loads. Look for tools and solutions that can scale seamlessly as your requirements expand.
For this growth phase, Rock Smith offers a flexible credit system tailored to your needs. Their Pay-As-You-Go plan starts at $0.10 per credit with a minimum purchase of 50 credits ($5). For larger requirements, the Growth plan provides 550 credits per month with overage credits at $0.09 each, while the Professional plan offers 2,000 credits monthly with overages at $0.06 per credit. This system ensures you only pay for the capacity you use, making it easier to handle sudden spikes in testing volume without unnecessary complications.
Conclusion
The checklist above provides a clear roadmap for navigating your QA automation journey. With a structured 12-step approach, you can sidestep common challenges while aligning testing efforts with your business goals. By defining objectives early, assessing manual processes, and selecting the right tests to automate, you can streamline workflows, accelerate releases, and cut testing costs.
The rise of AI-powered testing is transforming the landscape. By late 2025, 81% of development teams had incorporated AI into their testing processes. These tools drastically reduce test creation time - from hours to mere minutes - and include features like self-healing scripts that adapt to UI changes automatically. Rock Smith, for example, combines AI with visual, intuitive testing and real-time monitoring capabilities.
"Some of the best testers I've known in my career are the worst scripters... Wouldn't it be amazing if I could have my best testers be able to do automation?" - Don Jackson, Agentic AI Expert, Perfecto
This quote highlights the practical advantages of AI-driven tools, empowering even non-scripting testers to contribute effectively. Start with stable, high-priority tests, such as regression and integration. Employ practices like version control for test scripts, separating test data from production, and integrating with your CI/CD pipeline to ensure rapid feedback with every code change. Keep track of metrics like defect detection rates and test execution times to monitor and refine your progress.
To kick things off, set clear goals, gather the necessary tools, and launch a pilot program. Scaling your automation efforts becomes seamless with Rock Smith's credit-based system. By following this structured approach, your team will be ready to embrace the next era of QA automation - one that is smarter, more efficient, and accessible to all team members.
FAQs
What are the key benefits of using AI in QA automation?
Using AI in QA automation brings a range of benefits that traditional testing methods simply can't match. For starters, AI-powered tools can self-heal when user interface elements are updated. This means they automatically adjust selectors to account for minor UI changes, which can cut test maintenance efforts by as much as 90%. Instead of spending time fixing broken tests, teams can concentrate on building and refining new features.
AI also takes accuracy and efficiency to the next level with intent-aware validations. This advanced capability reduces false positives and negatives, ensuring tests are more reliable. On top of that, AI can automatically generate realistic test data and prioritize the most important test cases, offering broader and quicker coverage. The result? A much faster testing process that provides speedy feedback to developers. This allows QA teams to redirect their energy toward critical tasks like exploratory testing.
The impact of these improvements is clear: more stable software releases, shorter development timelines, and better-quality products overall. AI isn't just a tool - it's a game-changer for QA automation.
Which tests should I automate first?
When diving into test automation, it's smart to start with tasks that are both frequent and time-consuming when done manually. Think about smoke tests or regression tests - these are perfect candidates. Focus on critical user journeys, like the checkout process or login flow, since these directly affect your business's bottom line. It's also important to stick with stable, predictable tests that deliver consistent results. Avoid tests that rely on UI elements that change frequently, as they can quickly become a maintenance headache.
Another key factor is weighing the return on investment (ROI). Compare the time and effort saved by automating tests with the resources needed to create and maintain those automation scripts. A good strategy is to start small: automate simple, standalone test cases first. This helps you build confidence and a scalable foundation before tackling more complex scenarios. By following this method, you'll maximize the benefits of automation while keeping the upkeep manageable.
What are the best tools to manage flaky tests in test automation?
Managing flaky tests is essential for ensuring dependable test automation. Tools like SmartBear TestComplete, CucumberStudio, and BitBar come equipped with advanced debugging features and detailed reports to help pinpoint and resolve flaky tests effectively.
Platforms such as BugSnag and AlertSite add another layer by offering monitoring tools to track patterns in flaky tests. Meanwhile, LoadNinja and QAComplete simplify test execution and upkeep, reducing instability and boosting the efficiency of your automation efforts.